Meg, what’s washing and blocking?
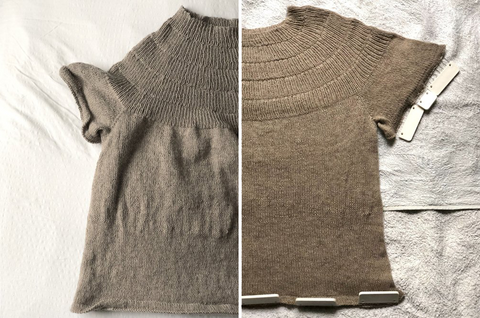
In short, this can be as simple as washing your knit, then drying it flat. Look at the images above (left = before, right = during blocking), you can see the transformation, It’s just the best and easiest way to Level Up Your Knitting. Disclaimer for the photos above: the colour of the knit didn’t change, the daylight did, so you won’t change the colour of your knit unless you’re using a reeeaaally unstably dyed yarn, which I’m not. I’ve used Knitting for Olive’s Merino in Oatmeal. This pattern is Petiteknit’s Ankers Tee with folded hems rather than ribbing for a less-tight sleeve.
In my opinion and experience, you need absolutely no specialist equipment at all. Washing and blocking may mean absolutely nothing to you at the moment, but by the end, I’m sure you’ll be just as familiar with the techniques as you are knitting and purling.
But why? What does it achieve?
Well, before we go any further, here’s what you’ll achieve if you do choose to wash and block (this list is not exhaustive):
a) accurate gauge - swatches and garments made by the designer are always blocked (unless they’re designing the pattern specifically not to be washed or blocked) to achieve a ‘true’ gauge. The unblocked gauge is nearly always tighter, and the garment will always grow with wear, which is why designers want to work out how much the yarn will grow to give you a better fitting project. They just want you to succeed and have the best outcome possible, washing and blocking is in your best interest.
b) smoothing out uneven tension - in the picture of the Ankers Tee above, you can probably see in the unblocked Tee, I swapped needles half way through the body. There’s a quite dramatic line, everything above the line was quite uneven and just not quite right. Everything below is fine! Now I’ve blocked it, it’s more or less gone! The unevenness has gone, but there’s still a minute difference in tension, but only if you are looking really hard, or are eye to eye with my belly button, which no one is.
c) get that trademark Knitting Curl out - you know the one, where the sides curl underneath and the bottom edge just curls up? Yeah. Blocking helps that too; you dry it flat, your knit will stay pretty flat. Not only does this make your garment easier to wear, if you’re working on a knitted-flat pattern, it’ll make sewing it up a breeze because you’re not fighting against curl the whole time.
d) just make your knit that 20% nicer - you’re washing the knitted-in grime out, you’re making the yarn bloom, you’re making it smell just how you like it, AND you’re making it as the designer intended. It’s a no brainer, is washing and blocking.
e) it makes everything primed for sewing - you see, knitting is stretchy and sewing is rigid, so you should always block before seaming, embroidery or sewing buttons on. Things move with blocking, you don’t want a tight underarm because you didn’t block before sewing, right?
You’ve mentioned swatching there, do I have to wash the swatch too?!
ABSOLUTELY!
You’ll often find your pattern doesn’t explicitly say to wash and block your swatch, but quite a few being released in recent times do explicitly say to do so. I know the new Ellie Summertop by Rust Knitwear does for sure, so I’m going to explain why you need to wash your swatch using this as an example.
The pattern calls for 26 stitches x 37 rows using a 3mm needle in double broken rib to make 10cm.

Tell me about the Ellie Summertop…
I’ve knitted a swatch using those exact requirements - a neat 26 stitches and 37 rows, knitted on only the finest 3mm needle (a Pony Perfect DPN, if you’re wondering) with Sandnes Garn Sunday yarn in the shade That Orange Feeling (a very hard colour to photograph accurately!). But look at the unblocked swatch (left), it’s come out at 7cm wide, and 9.5cm tall. Unblocked is about 30% too narrow! 30% is huge! This would mean the finished circumference of my size (C) would come out at only 60cm! It’s designed to be worn with 5-10cm of negative ease (smaller than your measurement), but this is crazy.
By this point, are you panicking? Are you half way along a vein of the Swatching Chart and thinking about increasing your needle size?
No! Don’t increase your needle size yet! Let me tell you why: rib textured stitches eat fabric. They just consume it, like some sort of knitting parasite. They just need blocking out…
 Okay, so a rib is a parasite?
Well…… no, not really as nothing is gone beyond retrieval. I was just messing. The fabric is still there, but think of when you fold an A4 piece of paper into a concertina. It can make the paper appear smaller. A rib does the same thing.
Once blocked, that very same swatch (right) is measuring perfectly at 10 x 10cm, and the knit looks MUCH better. Smoother, AND as the pattern as intended. Blocking has made the difference of 30% in this case. The swatch still isn’t perfect, as you can see, and the colour makes for a really tricky photo, but I’m now confident the finished Summertop in the size C will be absolutely grand.
If I didn’t block, I probably would’ve sized my needles up by at least 2mm, then wondered why my Ellie Summertop was baggy as I’d worn it. No one wants a baggy Summertop.
 What do I need to start?
Well, chances are, you have it all already.
To wash, I use whatever is on the side of the sink. Wool Wash (the half used nub in the middle of the picture), a bar of soap, that unidentified body wash you haven’t used in so long you’ve forgotten what it is (the glass pump bottle), or even your baby’s shampoo. Don’t use anything that makes your skin go ~funny~, you're trying to care for your knit and not strip all the goodness out of it. If you use your Fairy Non Bio, Surf or Lidl’s own laundry powder on your knit, it’s going to shorten it’s lifespan, these detergents are quite harsh on protein fibres, such as wool and silk. A plain soap, such as the No Frills Knitting Wool Wash, is great on all fibres including plant and protein fibres.
To block, you will need towels, a flat surface, perhaps some pins and something you can put pins into, but more on that later.
Okay, I’m convinced. How do I wash?

So, washing is as simple as following the steps pictured above, from left to right:
1) Fill your sink, use a tiny spludge of whatever soap you fancy (suggestions above) and put your knits in. Let your knit sit in the water for at least 10 minutes, but the longer the better as the fibres take on more water and relax into their blocked state better. I’d say the benefits of soaking level out at about an hour or so of soaking, but come back to it whenever you remember it. Wash only one knit at a time, unless you’re sure the yarn dye won’t run or you’re using a lot of a similar colour. I normally wash more than one thing at a time to save time and water, but all the greys together, for example. Apart from the wash pictured above, where there was a grey sweater, oatmeal top and bright orange swatch. Nothing ran, it was just dirt.
2) Admire the murky water you have fermented! It’s always interesting seeing the grime your knits have picked up while knitting. You’re not only washing out the grime, you’re also washing out loose dye, so don’t be alarmed if your water is particularly saturated in colour. Drain the water and squeeze out the dirty water as best you can. Do not wring your knitwear, you increase the chance of felting it by about a bajillion percent. If your colours have run, I’d contact the manufacturer or dyer for advice - most commercial yarns don’t leech a huge amount, but some indie dyed ones do. The manufacturer or dyer should know best how to care for their yarn, it may be as simple as knitting a sacrificial cream swatch for all the spare dye to stick to.
3) Rinse either by filling up the sink and having a good swill around, or run your knit under the tap on a not-too-ferocious flow. Some people say running the tap over the knit causes felting, others (like me) have never had a problem with a gentle tap. Use your judgement.
4) Squeeze as much water out of your knit as you can.
 Wool holds onto water more than anything else, so make sure you lay your knit out flat in the biggest towel you have, then roll it up, and tread all over it.
Make sure you do this bit in an area that can absolutely get wet, because some floors are just not made for damp things to be pressed all over them by an adult weight on top. I often do mine in the bath tub (or shower tray, if you have one) because my floors don’t do very well with wet towel-burritos making a damp patch on the floor.
(why do bathrooms always have very yellow lights?)
Now to block? This bit sounds scary…
Yes! Now is blocking time. No, it’s not scary.
It depends on your finished knit, but it can be as simple as drying flat. Use anything flat. I often put a towel over my bed and use that, or you could use the living room floor, or a flat airer, or a yoga mat, or a kids play mat. Thick corrugated cardboard and big cork boards often work well too. I know blocking mats are a thing, but not in my world. Until they (hello manufacturers!) make one out of more sustainable materials than non-recyclable virgin plastic, which is what EVA foam is, I’ll stick with my non-specialist equipment.
If you’re desperate for a dedicated blocking mat, consider going on Facebook Marketplace or eBay before buying new. Obligatory environmental preach over, for today.
Remember: if you’re blocking a swatch, treat it like you would the finished knit.
 So what do I do if my knit is plain and just needs some reshaping?
1) unroll the knit-burrito and shake it out.
2) lay flat on top of a flat surface (here, it’s an over-bath airer from Ikea) and reshape until it looks about right.
3) leave the arms on top of the cardigan if they’re the right length once knitted, or leave them to dangle if you need a little extra length. The heaviness of the water will pull them down a little.
4) leave until completely dry, moving around slightly every now and then so it doesn’t get rack-lines down the front/back/sides

What about if it uses colourwork/rib/lace or is too curly, or needs to grow to fit?
1) locate your pinnable surface. A yoga mat or play mats are perfect for this, but I normally use cardboard or my bed with a towel draped over it. Needs must, limited space. Locate pins, either household pins, T-Pins or blocking pins. The choice is yours for which pins to use, I’m using Blocking Pins here.
2) unroll your knit-burrito, shake it out. Lay on a towel on your pinnable surface.
3) shape to roughly the right shape before starting to pin. Start with the curliest or most annoying edges first - in this case on my Ankers Tee, this was the hems. Give them a good smooth over and a pull.
4) pull and pin around the edges to achieve some tension to make your knit look smooth. If you have a lace knit with an edge, such as picot edging and it’s looking a bit sad, pin every picot right out, pull a little harder than usual. It’ll be worth it.
5) leave to dry once happy with shape. Do not unpin until completely dry!
 Does it not take ages to dry?
Well, yes and no.
It takes as long to dry as you want it to. For example, if you put it in direct sunlight or are able to block outside, you could possibly have a dry knit in a few hours. If you put it in the dampest corner of your Victorian terrace, it may take a few days, but it’ll dry eventually.
I have a few sneaky ways of getting things to dry in my damp Victorian terrace:
- station the dehumidifier (magic tool, if you haven’t got one, defo get one, they’re great) just next to or underneath your drying rack, you can usually have your knit dry within 24 hours by doing this. See picture (right) for my set up)
- put your blocking station next to the radiator or heater, this will help, but your room might get damp in the air due to the length of time it’ll need to dry, so keep the window open if you can
- if you’re using cardboard or some sort of portable blocking situation, you could put it outside, I have done this and the result was great!
- blow dry it with the hair dryer, just waft it over the top on a medium heat, there’s no need for a gale force wind to dry your knit.
How do I stop my pets/kids messing with it while it’s drying?
I don’t think there’s any clear cut answer for this one!
I’d try and use a space that’s a bit out of the way, and use some of the speed-the-drying-process tips to try and get things going a bit faster. Try and shut the kids/pets out of the blocking room if you can, or take it to your childless or petless friend’s house and do it there.
I don’t have pets or kids, so take my answer with a pinch of salt as you probably know better than me on how to deter small hands and sharp claws…
I’ve done all these steps, but nothing has changed?
Okay, this is common for some synthetic yarns, especially very high-content synthetic yarns like 100% acrylic.
If you’re using an acrylic or polyester yarn, you want to steam block it instead, so in this case, you’re washing to remove the knitted-in grime, then drying (which won’t take long because the fibres don’t take on water), then steam blocking.
To steam block, you need to pin your knit out as best you can in the shape you want it (you may be fighting slightly against the knit here) and then puff steam using your iron or clothes steamer, just over the top of your knit, about 5cm away. Lay a tea towel or sheet over the top if you’re worried about your knit. Let the knit cool and dry completely (steaming will make it a little damp) before you unpin, you have to let it set.
Don’t touch it with the iron or steamer plate because you will melt your yarn and end up with a hard patch. Sort of like when you drop your hair straighteners on the carpet… no? Just me then.
My knit has come out too small, what now?
Blocking comes right into it’s element here, just keep pulling and pinning until you reach the measurements desired. I can quite often gain about 10cm on the length of something and 5cm on the width without a knit looking too weird.
If it’s been blocked already, try it on to see where the problem areas are first, then re-block with attention paid to the length or width. You can often gain more in one direction than the other, so just be mindful that if it’s both width and length, or the difference to get to the desired size is more than about 10% of the knit’s length or width, I’d start looking for my smaller friends (hey Kirsty) to give my knit to.
Now it’s too big!?
Oh no! Was the knit too big to begin with (before blocking) or did you pull and reshape too hard?
We’ve all done it. Wash again, then just leave to dry flat, try not to pull anything, just leave it as is. If the knit was too big to begin with, again, start working out which of your friends or family are knitworthy.
Okay, I think I’m set. Can I contact you if I have more questions?
100% you can! Use the contact form, or email me at nofrillsknitting@gmail.com